Leaderboard

![JN[T]OoOoL](https://forum.multitheftauto.com/uploads/monthly_2016_09/984afa88a4a9add7eb29755bebc2f8a7_82269.thumb.png.8283966639e6c3a50e468f99c5f8bc38.png)

Popular Content
Showing content with the highest reputation on 16/04/20 in all areas
-
بسم الله الرحمن الرحيم السلام عليكم ورحمة الله وبركاتة أخبار الشباب عساكم طيبين , اول مساهمة تقريبا وثالث موضوع لي المهم حبيت اطرح ماب الاستراحة لسيرفر كنق الطارة الماب محوله من 2018 وركبته بالسيرفر تقريبا سنه وشوي وقررت اطرحه للعموم وأحول شيء جديد المهم مالكم بالطويلة الماب من تصميمي والمجسم من تحويلي والتكستر من اختياري الماب جاهز ماعليك الا انك تركبة بالاستضافة وتشغله والتعديل مفتوح سواء عالصور او اضافات عالمجسم ورجاءا حفظ الحقوق صور للماب او المجسم مادري اذا الصور بتظهر زمان عالمنتديات طبعا المركبات الي بالصور مو من ضمن الماب ذي عشان تعطي موارد للصورة رابط تحميل الماب و المجسم لااله الا الله,محمد رسول اللة وسلامتكم فأمان الله ورعايته حسابي انستقرام :jn_i ip Server:149.202.89.124:22003 ......2 points
-
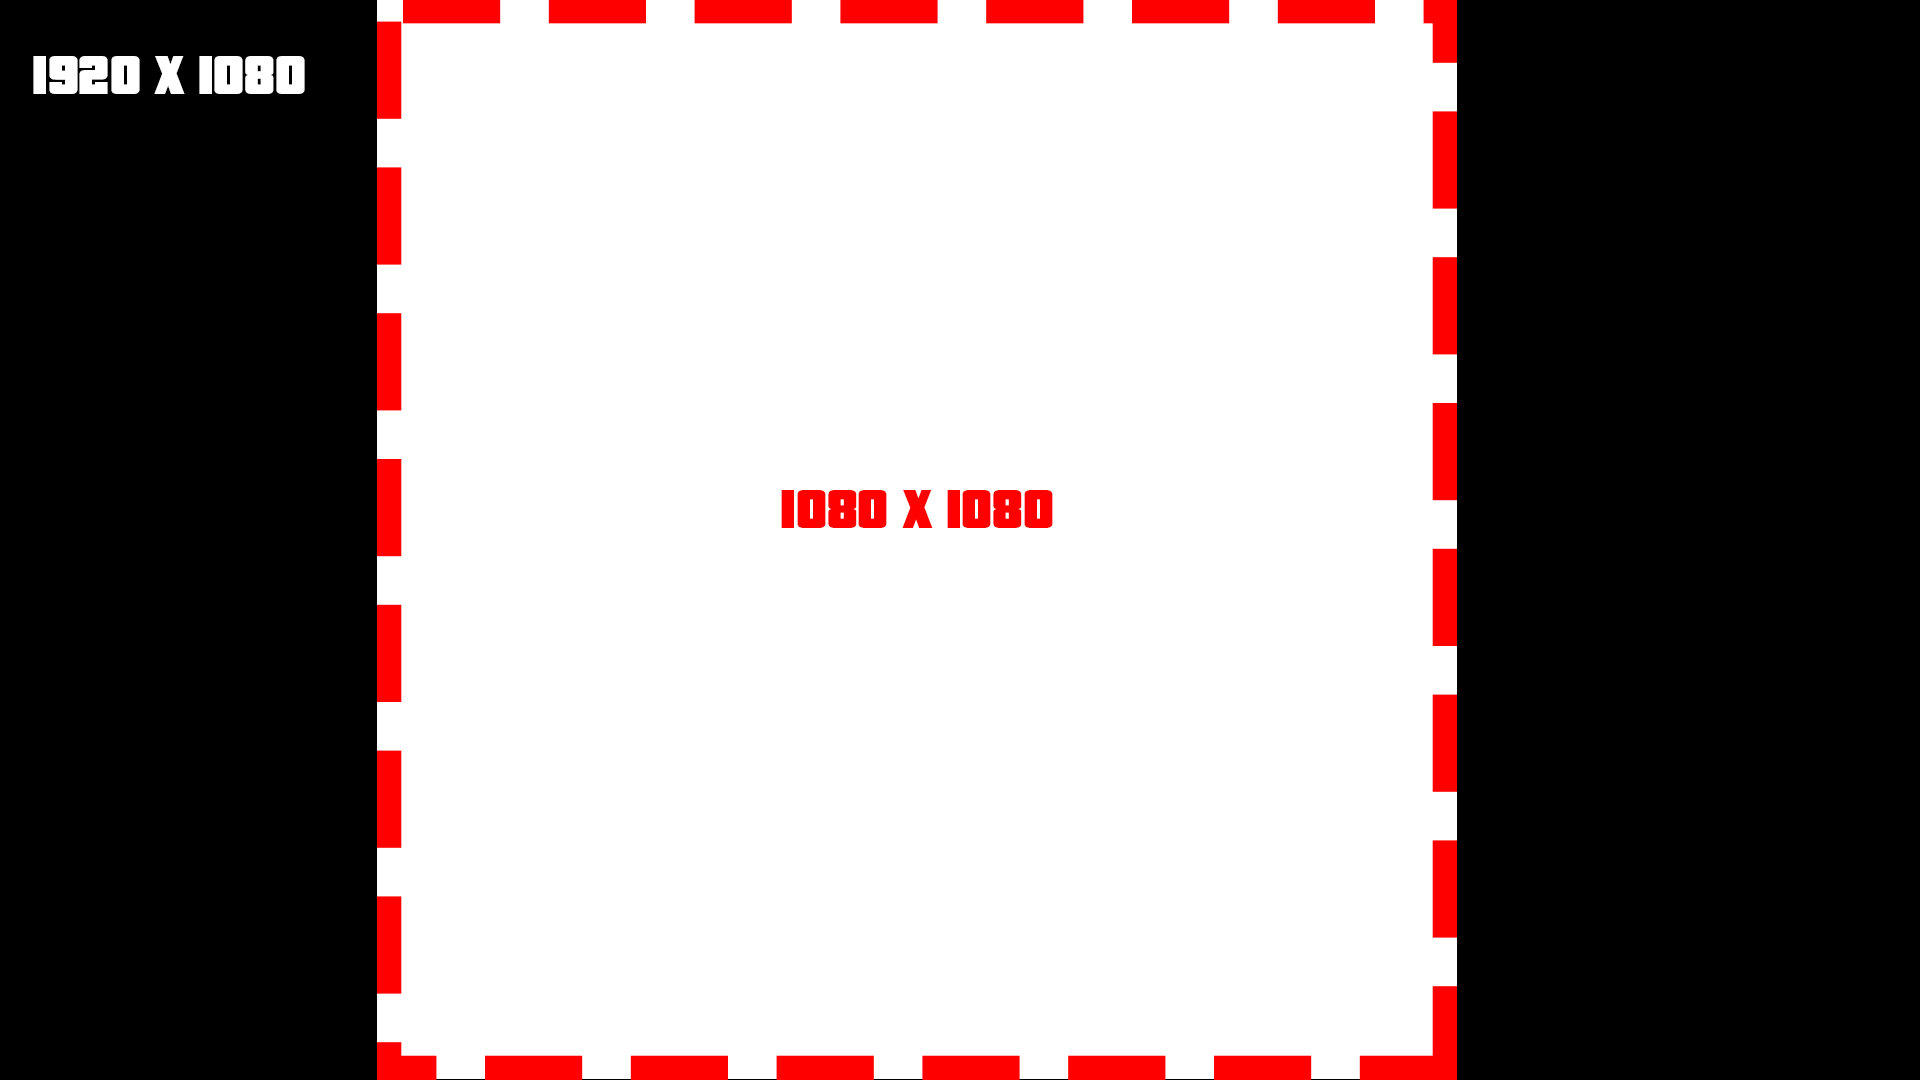
[TUT] Scaling DX The reason why I am creating this topic, is because there are a lot of people asking this question: And to be honest there is no best practice for. But here you have my recommendation as guidance for display them the ~s~a~m~e~ for all screen formats. There are two important factors while dealing with screen formats 1. Pixel density Indication: PPI(Pixels Per Inch) and some also use the term DPI(Dots Per Inch) They do not have to be the same while talking about printing stuff. This indication tells us about how many pixels are used per inch. Which more or less tells us how sharp/smooth things like text can be looking. PPI doesn't really play a big role, but to display something nicely you need enough pixels to display it. Else it will be either too small or too crispy. So be careful to not scale things (especially text) too small. 2. Display aspect ratio Wiki The difference between resolution X and resolution Y as a ratio. A list of common ratios: 4:3 5:4 3:2 16:10 16:9 So for example if we take: fHD: 1920x1080 Which has the ratio 16:9 that is calculated like this: 1920 / 16 = 120 120 * 9 = 1080 Scaling without ratio Before I am going to explain any of this, I am going to ask you an important question: Like this: (vertical) ▮ Or horizontal? ▅ I assume most people would agree to play MTA horizontal, else you are probably reading a book or document. p.s If you play MTA on a vertical screen, then we developers do not like you at all, sorry. So what does this tell us? You can assume that the X-resolution is never going to be smaller than the Y-resolution. Useful? You will figure it out. Doing the scaling Note: This part is ABOUT SCALING and not positioning. So what we are going to do is: Calculating a scale which can display the same DX on multiple screen formats > without messing with the ratio. Example: A computer runs MTA at a resolution of 1920 x 1080. Lets define that! local devScreenX = 1920 local devScreenY = 1080 If this code is used by a different pc, we also need to know on which resolution it is running: local screenX, screenY = guiGetScreenSize() For the next step we have to look at this screenshot: I have cut out of the wide-screen format a square. Squares have the ratio 1:1, which means that we have removed our ratio difference from this screen resolution. It is very easy to do, as our Y * Y resolution makes exactly that beautiful square! The next thing we have to do is creating our scaling value. This value is required for adjust our resolution values so that they match to every screen format. So to use our ratio 1:1, we use the Y resolution to achieve that: local scaleValue = screenY / devScreenY And as last we can create a rectangle shape that is displayed at the center of every screen format, perfectly! local devScreenX = 1920 local devScreenY = 1080 local screenX, screenY = guiGetScreenSize() local scaleValue = screenY / devScreenY addEventHandler("onClientRender", root, function () -- create a scaled size local sizeX = scaleValue * 300 -- 300px local sizeY = scaleValue * 50 -- 50px -- get the center of the screen local centerX = screenX / 2 local centerY = screenY / 2 -- calculate the starting point of the rectangle local startRectangleX = centerX - (sizeX / 2) local startRectangleY = centerY - (sizeY / 2) dxDrawRectangle ( startRectangleX, startRectangleY, sizeX, sizeY, tocolor ( 255, 255, 255, 255 ) ) end) Lower limit What if we have a resolution of 800x600? And the text is getting too small? Making sure that the pixel density is OK, is very important. So to counter that we have to make sure that the text is not getting too small. Our development Y resolution is 1080 pixels. And we are dealing with an Y resolution 600 pixels. The first thing we are going to look at, is what the scale is going to be at that point. 600 / 1080 = 0.55555555555555555555555555555556 It is not very nice to have your text scaled to 55.5% of the original size, when having low resolution already. But without scaling, the DX stuff might fill up the entire screen and that is just as bad. So what we now need is a limit, in this case a lower limit. scaleValue = math.max(scaleValue, 0.65) The math.max function returns the highest value of all the arguments you put in to it. In this case it contains the: scaleValue: 0.555 And the lower limit of: 0.65 This will make sure that the DX stuff is not getting smaller than 65%. This might make text read able for a 800x600 resolution. Positioning Do you want to place your dx-effects at a specific place on your screen? See the following useful function: https://wiki.multitheftauto.com/wiki/GetScreenStartPositionFromBox
 1 point
 -
mtasa://51.254.235.204:22004 Introduction: Forseti is an old school Freeroam/RPG with a retro theme. We wanted to re-capture the nostalgia of GTA San Andreas. Well, what can you do in this server? Let's give you some examples. You can: Buy houses, change property name, lock/unlock them, set them for sale, and change their price & more. Buy vehicles, add unique upgrades, park them, change their price and set them for sale, etc. Trade your vehicles with other players, buy and sell them for amounts you set. This includes new vehicles we added ourselves, as well as new upgrades. You can create or join gangs and fight with others for very valuable areas on the map. You can capture or invade gang bases and make use of the amazing features they have. You can buy gang vehicles for your base, buy ammo from your base for a cheaper price, upgrade your base protection, add homing missiles that will protect you from attackers. We also went ahead and re-balanced/replaced some weapons that were inferior to encourage more players get into these big fights. It's worth mentioning that these fights are completely optional and if you want to play more casually, you can completely avoid them if you are not interested. The gang bases are located in LV only. Cut the crap, how do I make money? We have a few options. You can press 'F3' to open GPS menu and go to mission locations. Driving a taxi: You can pick up customers and drop them off where they want to go. Simple and efficient. Fishing: You can buy a fishing rod for $50 from fishermen at coast areas and fish anywhere you want. Just press 'B' and wait for the fish to bite, then press 'B' again to reel them in. You will get a unique fish depending on server time and weather. Let's not spoil it further. Press 'I' to open your fish inventory. Lumberjack Work: You can buy an axe from weapon shops or lumberjacks on the map. Wood you cut will stay in your inventory. You can see how much wood you have by pressing 'I'. You can sell them back to lumberjacks for a good price. Drug Delivery: You can become a dealer at San Fierro and deliver the 'stuff' to junkies. Try not to be seen though. This mission has a built-in leveling system of it's own. More you do it, better rewards you will get. Zombie Purifier: Become a purifier at Area 51 and help the army clean up zombie infested areas. Be careful though. If you get bit you will get infected. It might not end pretty. Deathmatch: Do you have something to prove? Well then. You can join the current deathmatch by pressing 'F2'. You can pick up weapons from the area and fight each other. You get money every time you kill someone, and you get punished for dying." Recovering from a bad divorce? Your wife keeps threatening to take the kids? Went broke already? We got you! Forseti Bank will happly provide you with a loan* and take it back using force if you haven't paid for 4 weeks* in real time! *(1): Loans include interest rate 100% which is a totally humanly amount to take. You should be able to make this kind of money basically working for your all life. But don't worry. Our system has never shown to have failed. *(2): four weeks actually means 1 or 2 hours but don't worry. We will not demand any payment after your death. The map itself is filled with vehicles, why would I pay for one? You can buy vehicles from the car icons on the map ('F11'). Every vehicle shop is different, so don't forget to check other shops if you can't find the vehicle you want. --Player owned vehicles are faster than other vehicles and you can change their properties permanently. You also have full control over them. --You can enter Pay 'N' Spray to paint your vehicle, change headlights, and add upgrades. --Upgrades include: Bumpers, Wheels, Spoilers etc. & Adding a Neon to your vehicle and unlocking burnout. --You can spawn your vehicle, despawn it, lock it, start/stop engine and park it from our main menu. ('F1' or 'M') --You can also use the /car 1, car 2 etc. commands to spawn your vehicles right in front of you. --You can press 'L' to lock and unlock your vehicle from the inside. Other players can't lock your vehicle. --1-2-3-4-5-6-7-8 keys are used for some cool features when you are driving a vehicle. Open trunks, doors, change suspension etc. --If you park your vehicle, it will automatically respawn at the parked location and it will be locked. --You can set your vehicles for sale and other players can buy them. When you trade a vehicle, it'll keep the upgrades. --You can track the vehicle economy on our Discord server. Simply take a look at the #vehicles channel. --Every vehicle has a certain stock and it might run out, so buying vehicles with your spare money and selling them is a viable strategy. --Stocks are added every now and then depending on vehicle rarity, so don't worry, you will get a chance to buy them eventually. --Be careful not to leave your vehicles unlocked, other players can vandalize them at Pay 'N' Spray. ;)", I have 4 children and I have nowhere to live! Help me! You are in luck! We have a house system that's detailed but simple and fun to use. But how do you buy a house and what can you do with it? Houses not only provide you with a safe area, but they have other benefits as well. You can see the houses that are on sale on your map. You can walk to a house's pickup in front of their door and see all the information. When you buy a house, you will be granted full control over it. Such as: --If your house is a business, ALL money that are spent in there are yours. --Example: If you own LS Bistro you will gain all the money other players spend there. --You can set any house you own as your spawn point. If you die, you will respawn at your bed. --You will not take damage in your own house. --You can rename your property to whatever you want. --You can lock and unlock your house for other players. Don't want to be bothered? Lock it. --You can set your house on sale or take it off the sale for other players. Bought a house for 35k and you want to sell it for 35m? It's scummy, but go ahead. --You can change your house's sale value. Make it more expensive or cheaper. --You can instantly sell it back for a little less value. Took a loan and can't pay back? Maybe there's a way out. Did I say loans? That's a whole another thing, let's get back to our topic. You can see the houses you own on your main menu ('F1' or 'M') If you want to see where your house is located, clicking on it will start GPS.", I feel alone in this cold world! Someone take me in! Don't worry, you can join a gang or make your own for 50k. A gang leader can: --Invite players --Kick members --Change member ranks --Invade other gang bases --Change gang name --Change gang tag --Change gang color --Set aside some money for other members to spend on stuff --Upgrade gang gates, make them more resistant to explosions --Buy homing missiles that will attack incoming hostiles Capturing a gang base has a lot of good benefits. Such as spawning it as your spawn point, a steady money stream, buying weapons for cheaper, or using special gang vehicles. Note: You can ping a location on the map for your gang mates. (F11 + X + Right click) That's cool and all, but I got banned in every server I played on. What are the rules? We believe strict rules kill the fun. You are allowed to do anything you want and mess around as long as you aren't ruining it for others. That's all? No. We have a lot of small details and more big features that will make the server feel alive. GTA San Andreas interiors with their unique uses, walking food vendors and vehicles, automated trains that will take a break at stations, custom maps, some mechanical changes, fitting unique weather cycles for every state of it's own that will change on a rotation and much more. So go ahead! Do some fishing for random loot, cut the trees around the map, drive a taxi for NPCs, smuggle drugs or help the army clean up zombie infested areas. There's a bit too much to write about, so we will let you experience them on your own. No point in turning this into a book. Here are some random screenshots from the server we like:1 point
-
Merhaba Alexde Pele, Paul ile konuştuktan sonra böyle bir şeye şahit olmadığını, böyle bir sorun görmediğini bize iletti. Eğer şikayetiniz hâlâ devam ediyorsa, lütfen oyun içinden yöneticilerimize PM atın. Vakit bulduğunuzda ise forum kurallarını okumanızı öneririm. İyi eğlenceler1 point
-
Not Biased or anything but i'd totally play here ?1 point
-
Ok i didnt see comunication about peds in client side, thank u1 point
-
Not a bug: https://wiki.multitheftauto.com/wiki/SetPedStat Serverside: addCommandHandler("setMaxHealth", function (player) setPedStat(player, 24, 650) end) Also according to this formula: (not sure if this is valid) stat = 650 print(100 + (stat - 569) / 4.31) -- 118.79350348028 max health Source: https://wiki.multitheftauto.com/wiki/GetPedMaxHealth1 point
-
Комиссия провела независимое расследование и пришла к выводу, что данный аккаунт был заблокирован на срок 6480 дней неправомерно. В связи с этим обстоятельством было составлено постановление о разблокировании данного аккаунта на сервере XCCD и направлено администрации игрового сервера заказным письмом. После получения данного письма у администрации сервера будет 7 календарных дней на исправление сложившейся ситуации. Спасибо за обращение. Обращайтесь еще)1 point
-
الله يسعدك ياغالي منور مستمرين باذن الله منور منبعك أشكرك على ذوقك الرفيع ياخي كني اعرفك بس ناسي وين شفتك تسلم1 point
-
Oi @magnux, Este não é o primeiro tópico que você postou que eu tenho que corrigir. Problemas: 1) O que você cola é Lua inválida que não pode ser executada devido a algo estranho no seu editor (causando caracteres invisíveis em guias, espaços finais e recuos) que resultam neste erro: "unexpected symbol ' ' near 'then'" or in MTA: ERROR: Loading script failed: script\client.Lua:2: unexpected symbol near 'Â' O processo de fixação meticuloso envolvido (cada espaço ocupa uma área maior): https://streamable.com/jbiavv Não sei exatamente o que aconteceu, mas, pelo amor de Deus, use um editor normal para seus scripts, para que você não poste mais Lua inválida com esse problema. Recomendamos o Notepad++ ou o Visual Studio Code. 2) Você continua postando no quadro errado. Continuamos a movê-lo. Poste todas as suas perguntas em português no quadro de scripts em português (https://forum.multitheftauto.com/forum/127-programação-em-Lua/) 3) Lembre-se de formatar, coloque todo o código dentro de um bloco de código com este botão (selecione Lua): Observe para todos os outros que estão lendo: ele está postando código inválido (inválido para executar com erros), tanto com um estilo de código ruim quanto com uma qualidade de código ruim, mesmo se forçá-lo e formatá-lo à força como nos últimos tempos. Apenas não use nenhum código nos tópicos dele, desaconselhamos.1 point
-
Check this out: https://www.youtube.com/watch?v=nHZJolSKygk https://www.youtube.com/watch?v=Kn1pBKYZFAM1 point
-
local lastChatMessage = {} function ChatSystem ( text, msgType) local name = _getPlayerName( source ) local text = string.gsub( text,'#%x%x%x%x%x%x', " ") if ( msgType == 1 ) then return cancelEvent(true) end if ( msgType == 0 ) then cancelEvent(true) if chatTime[source] and chatTime[source] + tonumber(150) > getTickCount() then return outputChatBox("Please dont spam.",source,255,0,0) else chatTime[source] = getTickCount() end if lastChatMessage[source] and lastChatMessage[source] == text then return outputChatBox("You can't repeat that message so soon.",source,255,0,0,true) else lastChatMessage[source] = text end cancelEvent(true) local x,y,z = getElementPosition(source) for i,player in pairs(getElementsByType("player")) do local px,py,pz = getElementPosition(player) local distance = getDistanceBetweenPoints3D(x,y,z,px,py,pz) if distance < 100 then outputChatBox(name.."#FFFFFF: "..text,player,255,255,255,true) end end end end addEventHandler("onPlayerChat",root,ChatSystem) function _getPlayerName(player) local playerTeam = getPlayerTeam(player) if (playerTeam) then local r,g,b = getTeamColor(playerTeam) local color = RGBToHex(r,g,b) playerName = color..getPlayerName(player) else playerName = "#FFFFFF"..getPlayerName(player) end return playerName end function RGBToHex(red,green,blue) return string.format("#%.2X%.2X%.2X",red,green,blue) end Nem testei blz familiaa testa ai ver oque da!1 point
-
local consumeFuel = function() local vehicle = vehicleData.element local distance = getDistanceBetweenPoints2D(vehicle.position.x, vehicle.position.y, newPosition.x, newPosition.y) local engineConsumption = 0 if vehicle:getEngineState() then engineConsumption = 0.7 end if vehicleData.fuel >= 1 then vehicleData.fuel = vehicleData.fuel - (VEHICLE_FUEL_CONSUMPTION*(distance+engineConsumption)) newPosition.x, newPosition.y = vehicle.position.x, vehicle.position.y print(vehicleData.fuel) end if vehicleData.fuel < 1 then vehicleData.fuel = 0 vehicle:setEngineState(false) end end You do not have to create another function, you can just use 1 function instead. Every new function you create within a block, will keep the block alive. addEventHandler("onVehicleEnter", vehicleData.element, function(_, seat) if seat == 0 then local fuelTimer = setTimer(function(vehicle) consumeFuel() vehicle:setData("vehicle.datatable", vehicleData) end, 1000, 0, source) addEventHandler("onVehicleExit", source, function(_, seat) if seat == 0 then if isTimer(fuelTimer) then killTimer(fuelTimer) fuelTimer = nil end end end) end end) This code can cause a memory leak, since the code is merged with addEventHandler's that leave the Lua environment. Also here make use of 2 already existing function. If I want to have OOP tables (not meta table) shared between client/server. I have to split up the methods and re-attach them when they are available on the other side. > [1 file] Client only methods > [1 file] Server only methods > [1 file] Shared methods I do not know the best practice for this, but re-attaching them seems to work fine. Maybe you can use rawset: (not sure if that is allowed, I do not use MTA OOP, only regular) http://www.Lua.org/manual/5.1/manual.html#pdf-rawset And if you can't edit those classes, you can just put another meta layer on top of it, to make it work. I am not a pro,so I am pretty sure there are smarter people around here to give you the best answers.1 point
-
You can't call something that steals Discord accounts (for you to hack them) a "helpful virus". There are no excuses, you are targetting MTA users with illegal and malicious activity. Even more so, you still got the (infected) "Lag switch" video on YouTube and are posing a risk to other users to this date. You're making victims on MTA globally, it's hard to believe they "are now all your friends". No..1 point
-
حبيب ايكو ض٢ انت الفخم .. بس المسكو موجودة ض٢ بديت اشك فالموضوع ض٢1 point
-
سيرفر اثبت افضيلته بكل النواحي . بالتوفيق لكم1 point
-
جميل و مبدع مشاء الله1 point
-
مبدع اهنيك ع شغلك الصراحة1 point
-
thank you. FIxed now. use "updatedgs" will get the unstable version when there's no notification about update from DGS update system.1 point
-
تسلم يمينك ~1 point
-
شي ممتاز واكثر شي عجبني جرافيك ? شي خورافي استمر ياحبيبي1 point
-
الماب جميل , بس هو مع الجرافيكس ؟ ولا الجرافيكس من العبة الاصلية1 point
-
This tutorial is about scaling, not about positioning. If you are going to place it in the right + bottom corner, you have to start from that corner, not from the center. textWidth DOES NOT EXIST with the dxDrawText function. This function is making use of a text bounding box, which has a START (x,y) and an END (x,y). In this box you can align the the text: left, right, top, bottom. center(x), center(y). The following bounding box > starts at 0,0 which is the left + top corner and > ends on the right + bottom corner with some offset from the sides. The text is aligned to the right and to the bottom. local offsetFromSides = scaleV * 10 local textEndX = sx - offsetFromSides local textEndY = sy - offsetFromSides dxDrawText( text, 0, 0, textEndX, textEndY, tocolor(255, 255, 255, 255), scaleV*2, "arial", "right", "bottom")1 point
-
Vou lhe ajudar, antes que você faça vários postagens com o mesmo problema, você precisa aguardar alguém lhe responder, lembre-se, ninguém é obrigado a dar-lê códigos prontos. Altere a função "BuscaPlayerplayermoney" que você já tem, por essa, adicionei o código que apenas permitirá número. function BuscaPlayerplayermoney() if source == transplr then local text = guiGetText(transplr) if text == "" then for id, player in ipairs(getElementsByType("player")) do guiSetText(oplb3,"") end else for id, player in ipairs(getElementsByType("player")) do if string.find(string.upper(getPlayerName(player)), string.upper(text), 1, true) then guiSetText(oplb3,"Recomendado:\n"..getPlayerName(player)) veryname = getPlayerName(player) else guiSetText(oplb3,"") veryname = nil end end end end if isElement(atmfundo) and guiGetVisible(atmfundo) == true then local elemento = false if isElement(transmoney) then elemento = transmoney elseif isElement(saquemoneyedit) then elemento = saquemoneyedit elseif isElement(moneyedit) then elemento = moneyedit end if elemento ~= false then local text = guiGetText(elemento) local new_text = string.gsub( text, "[^0-9]", "" ) if new_text ~= text then guiSetText(elemento, new_text) end end end end addEventHandler("onClientGUIChanged", root, BuscaPlayerplayermoney)1 point
-
Introduction This guide intends to teach 3ds Max users the basics, and more advanced ways, of working with (environment) animations and rigs to enhance atmosphere of the game. Animations, moving images or however you name it, they are there, everywhere in games. GTA San Andreas and its predecessors do utilize animations, however to a limited extent; most environment models were kept frozen in the dark days of PC games to save computer resources. Few objects like mechanical oil drills and food store mascots are animated. Today we're past those days and have advanced in technology to exceed limits, and integrate known resource demanding features into our games without much of a performance impact. It's important to keep in mind that the Renderware engine has various limitations associated with models/3D assets. These limitations do apply very harsh on what this guide covers. Table of contents Demo reel - Custom rigs and animations Prerequisites Recommended Character skeleton Basics to skinning Simulation conversion to bones workflow Demo reel - Custom rigs and animations Prerequisites Must have Autodesk 3ds Max of any desired version. 2017+ needed to speed up cloth rigging. Must have Kam's Maxscripts. Must have Animation Manager tool. Recommended You can use virtually any modeling or animation software e.g Blender or Cinema 4D to do 90% of the work. 3ds Max is required to export to GTA formats IFP and DFF. It's recommended to have experience in game modding and 3D modeling software of choice. It's highly recommended to use Shagg_E's anim/char helper for easy setup of bones and animation. For those who calculate bone hierarchy, add SPunknown = 4 to Root bone's object property. It's possible to use ARKTOS Tools VertexToBones for converting vertex-baked animations to bone animations. It should be noted however that this does not create bone hierarchy the desired way. It creates bones that aren't linked to each other, only the root, so it generates the animation for each bone to move, not rotate, and thus the majority of the animation relies on position keys, where SA animations only support rotation keys. Character skeleton San Andreas uses bones for its character animations. These bones are linked together, forming a skeleton with joints that can be rotated. Motion capture data can be transferred onto bones to ease the creation of character and more detailed animations. This was done for GTA cutscene models primarily. On 3ds Max, bones can be virtually anything, ranging from camera's to dummies. When exporting to GTA formats, the bone objects are automatically converted into dummies (helpers). This is how bones worked in early 2000's and/or 90's. If you desire to convert a helper or model into a dummy, follow this CGTalk post's instructions. For creating a skeleton, place all bones around the inner mesh of the model. Everything must be in a hierarchy and bones can have as many children as desired. Naming conventions are only recommended for easier overview, however they can be named according to one's desire e.g Bone_0 - Bone_12. To have the bones show the way the imported skins ones do, head to Display Panel under Links, and check both boxes. Make sure this is done for every bone. This will display joint links in correct hierarchy in viewport. Some games may use vertex baked animations, thus negating the need for bones. This is often seen on models such as all types of clothing. For game engines that do not support vertex animation or dynamic cloth, bones will be used instead. Below is a spoiler of valid bone ID's for regular ped models. There are 31 functional bone ID's, 32 with Root included. Once again, bones does not have to use same naming convenience as presented below. They also don't have to use same order of ID's or bone hierarchy, so for instance, Pelvis and Jaw ID's can be exchanged, as long as Root ID = 0. Or, the Head bone can be child of R Hand, not necessarily the Neck. Basics to skinning Although not hugely covered in this guide; Skinned models use a different system from vehicles and map objects. Besides having their 3D mesh, they have a skeleton. A skeleton is made of bone joints linked to each other, so that when the shoulder moves, the lower arm does as well. A bone will only affect part of the mesh that it's weighed to. If you weigh all vertices of the player's hat to the Head bone, then the hat will move according to the head bone. If you weigh all of the hat's vertices to the Pelvis bone, then the hat will stay static in air while the head moves. All vertices must be affiliated with at least one bone. Although a skin can have 32 bones, it'll work just fine if you weigh all vertices to only 3 bones. Not all bones require to be affiliated with a vertex. If you try to export a skinned model where 1 vertex is not weighted, the exporter will reject your request to export or your game will crash. A skin can have as few as 2 bones (root and children), so if your model has only 8 vertices, there's really no point having 32 bones when only 8 are functional. Below image (credits: IamObama) shows the basics to weighing joints to a character mesh. While this doesn't show all of the bones, it can prove very helpful as a lookup while weighing vertices to your skin. You can also load in a GTA ped to reference its miscellaneous bones e.g facial and fingers. Simulation conversion to bones workflow Note: The following process or techniques may apply for Blender/Maya users as well. 3ds Max has inbuilt cloth physics. These can simulate with help of gravity, wind, etc. and is a great way to generate animations for cloth-like elements. With help of tracking markers, you can track a bone to follow the orientation of a marker, which can then be baked into keyframes. The process is incredibly simple, you just have to understand the basics of cloth physics and object constraints. Video tutorial: Text tutorial: Create your model simulation model Be mindful about geometry and bone count when creating your model. The fewer polygons, the more rough the animation will be. The more polygons, the more cloth-like it'll look. The more bones with keyframes, the larger the file size (lots) of your IFP. For flags, one bone should never have full influence of a vertex. A vertex should always be affected by 2 or more different bones for a nice blend. It may be an idea to load in a GTA model so that you can somewhat reference the scale, if you don't have access to a dimension ruler. For the purpose of the guide (assuming you follow along the video), create a plane (primitive) with 8 segments in both directions. Make it length: 1,280 meter, width: 848 millimeters. Prepare your simulation model Convert the primitive to either editable mesh or editable poly. Polygon mode is more sustainable for modeling, but it needs to be in Mesh mode once you export it. Enable angle snap (default: A) and rotate it so it stands vertically. On the Hierarchy tab, reset transform to reset rotation values to 0. Add a Cloth modifier to your model. Go to sub-object level group of cloth modifier. Select the vertices that you want to act as solid points (e.g ones attached to flagpole). Click Drag as group mode. Simulate the model Head to Create tab > Space warps. Create a wind. Its position doesn't matter, only the rotation which represents the direction, matters. The default settings of the wind are usually too high. Try setting strength: 0,12, Turbulence: 0,8, Frequency: 0,05. Select the simulation model. On the cloth modifier, select Cloth forces and choose the wind. On the same interface, select Object properties. Select the model's name, then select Cloth, then pick a preset of your preference. Try silk or cashmere. You can optionally use Edge springs. I'm not fully sure what it represents, but I believe it's got to do with keeping the edges intact and not stretching them (which you don't want for bone animations). Try simulating the model. You may want to increase the timeline to a more reasonable duration, but be cautious as the higher it goes, the more your potato will suffer. If you aren't happy with the simulation, erase it and it'll let you try resimulate it. If you're unlucky enough to get the infamous error message dT increased/decreased you may want to start a new 3ds max project file... Create your real model In most cases you'll simply clone the simulated model, name the clone skin_mesh (name can be anything, but for easier scene management, name it something related). Remove the cloth modifier from your "real" model. For the simulated model, select the create keys button in cloth modifier. This will collapse your modifier and bake animation into keyframes, can NOT be reverted! Move the simulated model a bit away from the skin mesh, so that it'll make it significantly easier for a later procedure. Make sure to center the skin mesh to 0,0,0 or you'll get real trouble later. Convert the model to editable mesh. When you need to export later, it doesn't want it as editable poly. Create bones for your model Apply a Skin modifier to your model. This is used to carry the skeleton bones for later on. To make the bone creation and setup a whole lot easier, run Shagg_E's animation tools (link in top of thread). If you simply choose to create a set of dummies, his script won't recognise them as bones and you'll have to add all the object properties manually. So do yourself a favor and use his tool. Navigate to the Char helper section on the interface. Click create root, this'll create a dummy in center of the scene, assuming it corresponds to the model's center. Click create children, this'll create a dummy linked to the root. Drag it out from the model and title it "Pelvis" (again naming doesn't matter, can be "sampsucks" and samp modders will know once they load in your skin!). This bone is usually needed to keep part of the model's verts (abbreviation for vertices) in place, e.g flag pole attachments. Keep creating children bones until you reach your desired amount. It's a good idea to enable snaps (to vertex) so that you can magnet position bones directly onto the vertices. Select any bone in hierarchy and click Calculate for all hierarchy. This calculates bone ID's, bone index and bone type. If you were to set this yourself, you would need to understand how they work, on top of this it would be very time consuming. So we can all thank Shagg_E for making this wonderful script. Select the root bone, head to object properties, in user defined add to the string SPunknown = 4 or else your skin won't work as intended. Prepare motion tracking Create motion tracking markers. Head to create tab -> helpers -> point helper. Keep their scale at .2 or so. Spawn the amount equivalent to the amount of functional bones (excluding root and pelvis). Select all of the point helpers. Under the Animation rollout, select constraint -> attachment constraint -> select the simulated model. Go to Motion tab. The positions are based on triangle points, so you have to insert either 0 or 1 on A and B, then pick a face. It'll make more sense if you watch the video. You need to position the point helpers to the vertices where the bones are positioned at. I don't know of any more efficient way of doing this. On the model's skin modifier, add all functional bones (except root and pelvis). If you're running Max 2017+, you can use Voxel Solver to automate rigging (rough solution) and works great for simulated models. Use setting: falloff 0,2, max influence 3, max resolution 128. Try rotating some bones and hopefully they should affect the skin mesh. Now add the rest of the bones which you didn't rig to the model. If the model is a flag, then select a few vertices that you want to be solid in place, and weight those to pelvis at 100 weight. Track the motion of the simulated model Select all point helpers, click E for rotate, click F12 for rotate transforms and reset all 3 axis to 0. If you don't, some of your bones will be rotated massively (undesired). Apply an orientation constraint to all of your bones, 1 by 1, to their point helper counterpart. This tracks the rotations of the point helpers onto the dummy bones. You can add a shortcut to speed this up a tad... Select all the functional bones. Go to motion tab, click trajectories. This is where you bake the orientation constraints into keyframes for your bone animation. Settings below. Start time = 0 by default, or the first frame of your timeline End time = last frame of timeline OR whenever you desire Samples = amount of keys for the animation. If Start = 0, End = 1500, you can add 1500 samples to have 1500 keys generated, or 150 to have 150 keys generated. Don't use much more than 200 samples or you'll get in serious trouble. You'll have to optimize your keyframes at some point. You can change the keyframe tangent mode (i prefer auto or spline) to change the velocity of the keyframes. Once everything is set, click collapse. This generates keyframes. Animation is now made. Making the cloth simulation seamless/loop is another story. Finishing up Custom model and custom IFP is essentially done now. In order to export animation from 3ds Max, simply select all bones, find an IFP file on your computer and clone it, on 3ds Max run the IFP script, click "load IFP" and then save your custom animation to the cloned IFP file. You can remove excess IFP animations from the IFP archive by using Animation Manager Tool. Have fun with it! There was a recent update where MTA made a couple dozens of unused ped ID's available for servers to use. This is what inspired me to make this guide, since you could use those ID's to "add" new models, of which could be environment models to bring life to the world. Custom IFP's can simply be added into the server, they don't need to replace existing ID's. It's important to note that by changing bone ID's, you change the way that the custom model reacts to default animations. As such, models like banners will appear incredibly distorted. In those cases it's suggested to create some idle, walkstyle and run animations. It's also important to note that you can create LOD animations, since there's really no limit for how many IFP's a server can have. LOD animations may be very handy for animations that have highly dense simulations applied, so the further away the player goes, the less keyframes will be processed.1 point