Leaderboard
Popular Content
Showing content with the highest reputation on 20/01/22 in all areas
-
Dear MTA forums administration, there appears to be a fair amount of users on our forums that auto-translate all of the content on this web-page. Support topics start with the impression that they are awkwardly-speaking-but-trying English speakers but in replies the quotes turn out to be Spanish, Polish, etc giving away that they actually auto-translate everything. There are people who do not know about this problem because they just set the auto-translator for everything English. Those people suffer from issues of understanding, essentially because the auto-translator botches-up the original writing. I suggest that users should have the ability to decide whether their forums posts should be posted using auto-translation disabled on the HTML elements. This can be done using the HTML translate attribute on div tags. I suggest that there be a new option in the user's preferences to put this attribute on all of their posts by default. Then you should be able to decide on an individual post's basis if auto-translation should be allowed. Please think about the future of our forums. ?1 point
-
Disclaimer: This is aimed at MTA open source contributors only. Hi devs! If you're looking for support regarding MTA C++/module/resource development, or you have some ideas or want to discuss about MTA development related matters, come and join our dedicated MTA development Discord server at https://discord.com/invite/GNN6PRtTnu where we have dedicated channels for various topics. The server is English only. Non-development chatter is prohibited. Please note that the MTA development server is only for development matters. If you need help with your MTA client/server or scripting, or you just want to chat and hang around, please use our official Discord server instead at https://discord.com/invite/mtasa1 point
-
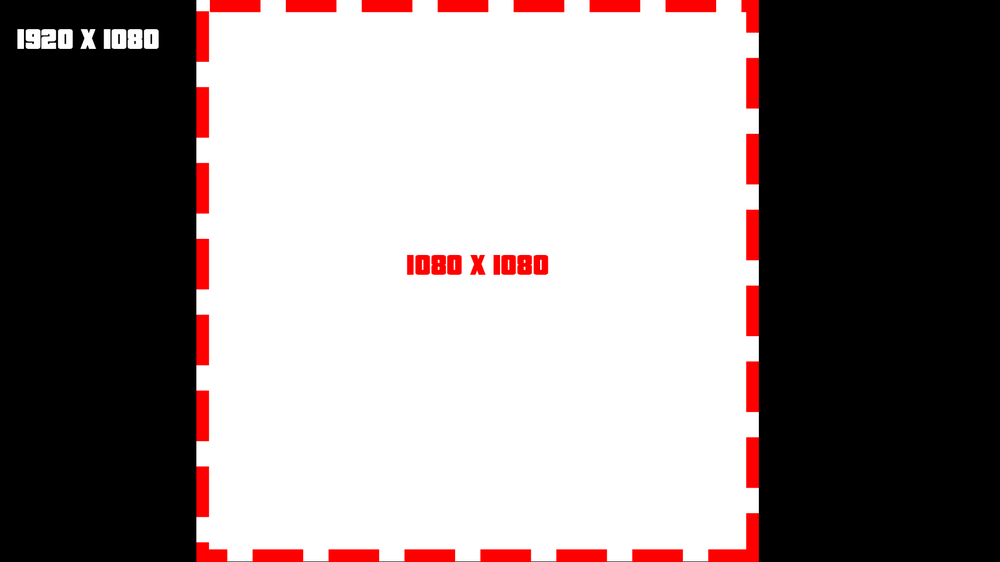
[TUT] Scaling DX The reason why I am creating this topic, is because there are a lot of people asking this question: And to be honest there is no best practice for. But here you have my recommendation as guidance for display them the ~s~a~m~e~ for all screen formats. There are two important factors while dealing with screen formats 1. Pixel density Indication: PPI(Pixels Per Inch) and some also use the term DPI(Dots Per Inch) They do not have to be the same while talking about printing stuff. This indication tells us about how many pixels are used per inch. Which more or less tells us how sharp/smooth things like text can be looking. PPI doesn't really play a big role, but to display something nicely you need enough pixels to display it. Else it will be either too small or too crispy. So be careful to not scale things (especially text) too small. 2. Display aspect ratio Wiki The difference between resolution X and resolution Y as a ratio. A list of common ratios: 4:3 5:4 3:2 16:10 16:9 So for example if we take: fHD: 1920x1080 Which has the ratio 16:9 that is calculated like this: 1920 / 16 = 120 120 * 9 = 1080 Scaling without ratio Before I am going to explain any of this, I am going to ask you an important question: Like this: (vertical) ▮ Or horizontal? ▅ I assume most people would agree to play MTA horizontal, else you are probably reading a book or document. p.s If you play MTA on a vertical screen, then we developers do not like you at all, sorry. So what does this tell us? You can assume that the X-resolution is never going to be smaller than the Y-resolution. Useful? You will figure it out. Doing the scaling Note: This part is ABOUT SCALING and not positioning. So what we are going to do is: Calculating a scale which can display the same DX on multiple screen formats > without messing with the ratio. Example: A computer runs MTA at a resolution of 1920 x 1080. Lets define that! local devScreenX = 1920 local devScreenY = 1080 If this code is used by a different pc, we also need to know on which resolution it is running: local screenX, screenY = guiGetScreenSize() For the next step we have to look at this screenshot: I have cut out of the wide-screen format a square. Squares have the ratio 1:1, which means that we have removed our ratio difference from this screen resolution. It is very easy to do, as our Y * Y resolution makes exactly that beautiful square! The next thing we have to do is creating our scaling value. This value is required for adjust our resolution values so that they match to every screen format. So to use our ratio 1:1, we use the Y resolution to achieve that: local scaleValue = screenY / devScreenY And as last we can create a rectangle shape that is displayed at the center of every screen format, perfectly! local devScreenX = 1920 local devScreenY = 1080 local screenX, screenY = guiGetScreenSize() local scaleValue = screenY / devScreenY addEventHandler("onClientRender", root, function () -- create a scaled size local sizeX = scaleValue * 300 -- 300px local sizeY = scaleValue * 50 -- 50px -- get the center of the screen local centerX = screenX / 2 local centerY = screenY / 2 -- calculate the starting point of the rectangle local startRectangleX = centerX - (sizeX / 2) local startRectangleY = centerY - (sizeY / 2) dxDrawRectangle ( startRectangleX, startRectangleY, sizeX, sizeY, tocolor ( 255, 255, 255, 255 ) ) end) Lower limit What if we have a resolution of 800x600? And the text is getting too small? Making sure that the pixel density is OK, is very important. So to counter that we have to make sure that the text is not getting too small. Our development Y resolution is 1080 pixels. And we are dealing with an Y resolution 600 pixels. The first thing we are going to look at, is what the scale is going to be at that point. 600 / 1080 = 0.55555555555555555555555555555556 It is not very nice to have your text scaled to 55.5% of the original size, when having low resolution already. But without scaling, the DX stuff might fill up the entire screen and that is just as bad. So what we now need is a limit, in this case a lower limit. scaleValue = math.max(scaleValue, 0.65) The math.max function returns the highest value of all the arguments you put in to it. In this case it contains the: scaleValue: 0.555 And the lower limit of: 0.65 This will make sure that the DX stuff is not getting smaller than 65%. This might make text read able for a 800x600 resolution. Positioning Do you want to place your dx-effects at a specific place on your screen? See the following useful function: https://wiki.multitheftauto.com/wiki/GetScreenStartPositionFromBox1 point
-
Hello Everyone, I'm giving away these free models with their mapping "I totally don't mind if the mapping get reedited as it's pretty much minimalistic", Los Santos Petrol Station : More pictures https://imgur.com/UnvsL6C https://imgur.com/oSQDrAj https://imgur.com/wC4RF5u Grotti Showroom : More pictures : https://imgur.com/2gy57xW Los Santos Downtown [3 new interiors ] For Download Contact me On discord : skann#83621 point
-
Our explanation today is about how to play the MTV game The first Windows 7 version is .IOS version how to download Windows_7.ios : The second thing you download VMware Workstation 15 Player how to download VMware Workstation 15 Player Fourth way to install in the windows_7_ios program : how to download Grand Theft Auto San Andreas : How to transform game from your pc to VM Host : Multi theft auto san download : How to use problems and solutions : I hope you will support the channel because a relative is going to download a clip explaining in detail how to carry it and install it. MRPOP:) Peace is a good conclusion1 point
-
1 point
-
At 0:49, there's a waterfall. Now I know that the water shader was used, but how exactly was this waterfall made?1 point
-
Dear MTA community, I have been spending my last 8 weeks on mathematical problems. One of them is the 3D Frustum-Plane intersection that is used by GPUs to draw triangles onto your screen. If you want to learn more about this please consider reading this thread. Promotional Video: https://www.youtube.com/watch?v=RQy3Q4Xe110 Prerequisites This tutorial is aimed at people who are capable of scientific thinking and are willing to playfully learn with Lua code. To execute steps in this tutorial minimal knowledge of Linear Algebra and Lua is required. Required MTA Resource: https://github.com/quiret/mta_lua_3d_math Description of the math Imagine that we have got a frustum and a plane in a 3D room described by coordinates plus their boundaries. By intersecting both you obtain all coordinates on a screen along with their depth values. Now think about how your vision works. You see distant objects smaller than closer ones. You rotate your eyes to angles of vision. If we were to put this concept into terms of math we could say: the plane of vision is bigger in the distance than in close proximity. The frustum is a seamless row of vision planes starting from the pyramid tip to the bottom. How to use the MTA Resource Just download the GitHub repository into a folder of your MTA Resources, name it "math_3d_nonlin" and start it. You can execute the following commands for quick testing: send_bbuf: draws a simple depth test draw_model: draws the DFF file "gfriend.dff" Now we have got the basics out of the way. Time to start coding. Please create a new "_math_test.Lua" script file in the resource and include it server-side at the bottom of meta.xml. Tutorial: software rendering a plane on screen Open your _math_test.Lua and include the following code: local viewFrustum = createViewFrustum( createVector(0, 0, 0), -- position createVector(10, 0, 0), -- right createVector(0, 0, 10), -- up createVector(0, 20, 0) -- front ); local plane = createPlane( createVector(-3, 10, -3), createVector(6, 0, 0), createVector(0, 0, 6) ); local function task_draw_scene(thread) local bbuf = create_backbuffer(640, 480, 255, 255, 0, 50); local dbuf = createDepthBuffer(640, 480, 1); local time_start = getTickCount(); do local gotToDraw, numDrawn, numSkipped = draw_plane_on_bbuf(viewFrustum, bbuf, dbuf, plane, true); if ( gotToDraw ) then outputDebugString( "drawn " .. numDrawn .. " pixels (skipped " .. numSkipped .. ")" ); end end local time_end = getTickCount(); local ms_diff = ( time_end - time_start ); outputDebugString( "render time: " .. ms_diff .. "ms" ); taskUpdate( 1, "creating backbuffer color composition string" ); local bbuf_width_ushort = num_to_ushort_bytes( bbuf.width ); local bbuf_height_ushort = num_to_ushort_bytes( bbuf.height ); local pixels_str = table.concat(bbuf.items); local bbuf_string = pixels_str .. ( bbuf_width_ushort .. bbuf_height_ushort ); taskUpdate( false, "sending backbuffer to clients (render time: " .. ms_diff .. "ms)" ); local players = getElementsByType("player"); for m,n in ipairs(players) do triggerClientEvent(n, "onServerTransmitImage", root, bbuf_string); end outputDebugString("sent backbuffer to clients"); end addCommandHandler( "testdraw", function(player) spawnTask(task_draw_scene); end ); Result: Try executing the "testdraw" command. At the top of file you see the definition of our frustum cone as well as a plane. By calling the function "draw_plane_on_bbuf" we put color information into bbuf for exactly the pixels that make up the rectangle. If you change the plane definition to... local plane = createPlane( createVector(-2, 10, -4), createVector(6, 0, 3), createVector(-2, 0, 6) ); you instead get this image: Try changing around the coordinates of frustum and plane to obtain different pictures! Tutorial: software rendering a triangle on screen Take the same code as in the tutorial above but change line 19 to: local gotToDraw, numDrawn, numSkipped = draw_plane_on_bbuf(viewFrustum, bbuf, dbuf, plane, true, "tri"); This way we have changed the primitive type to triangle (rectangle is the default). Try executing the "testdraw" command again to inspect the new result! Tutorial: drawing a DFF file onto screen Instead of writing triangle definitions by hand we can take them from a DFF file instead. DFF files are storage of triangle and vertex information along with 3D rotation and translation information. By extacting the triangles from the DFF file we can put them into our algorithm to software-render them! Here is a related excerpt from math_server.Lua: local modelToDraw = false; do local modelFile = fileOpen("gfriend.dff"); if (modelFile) then modelToDraw = rwReadClump(modelFile); fileClose(modelFile); end end local function task_draw_model(thread) local bbuf = create_backbuffer(640, 480, 255, 255, 0, 50); local dbuf = createDepthBuffer(640, 480, 1); local time_start = getTickCount(); local num_triangles_drawn = 0; if (modelToDraw) then -- Setup the camera. local geom = modelToDraw.geomlist[1]; local mt = geom.morphTargets[1]; local centerSphere = mt.sphere; local camPos = viewFrustum.getPos(); camPos.setX(centerSphere.x); camPos.setY(centerSphere.y - 3.8); camPos.setZ(centerSphere.z); local camFront = viewFrustum.getFront(); camFront.setX(0); camFront.setY(5 + centerSphere.r * 2); camFront.setZ(0); local camRight = viewFrustum.getRight(); camRight.setX(centerSphere.r * 2); camRight.setY(0); camRight.getZ(0); local camUp = viewFrustum.getUp(); camUp.setX(0); camUp.setY(0); camUp.setZ(centerSphere.r * 2); local triPlane = createPlane( createVector(0, 0, 0), createVector(0, 0, 0), createVector(0, 0, 0) ); local vertices = modelToDraw.geomlist[1].morphTargets[1].vertices; local triangles = modelToDraw.geomlist[1].triangles; local tpos = triPlane.getPos(); local tu = triPlane.getU(); local tv = triPlane.getV(); for m,n in ipairs(triangles) do taskUpdate( m / #triangles, "drawing triangle #" .. m ); local vert1 = vertices[n.vertex1 + 1]; local vert2 = vertices[n.vertex2 + 1]; local vert3 = vertices[n.vertex3 + 1]; tpos.setX(vert1.x); tpos.setY(vert1.y); tpos.setZ(vert1.z); tu.setX(vert2.x - vert1.x); tu.setY(vert2.y - vert1.y); tu.setZ(vert2.z - vert1.z); tv.setX(vert3.x - vert1.x); tv.setY(vert3.y - vert1.y); tv.setZ(vert3.z - vert1.z); local gotToDraw, numDrawn, numSkipped = draw_plane_on_bbuf(viewFrustum, bbuf, dbuf, triPlane, false, "tri"); if (gotToDraw) and (numDrawn >= 1) then num_triangles_drawn = num_triangles_drawn + 1; end end end local time_end = getTickCount(); local ms_diff = ( time_end - time_start ); (...) end The code first loads a DFF file called "gfriend.dff" and stores it inside the "modelToDraw" variable. Once you execute the "draw_model" command the code looks up the first geometry in the DFF file and fetches all triangles associated with it. The rendering camera is set up to point at the middle of the model. Then all triangles are drawn one-by-one. https://twitter.com/rplgn/status/1230650912345067520 Try swapping the DFF file for another one, like biker.dff, and examine the results! Maybe extract a different DFF file from GTA:SA and replace gfriend.dff with that one. External references: math calculation on paper example: https://imgur.com/gallery/rLvln3X German thread on mta-sa.org: https://www.mta-sa.org/thread/38693-3d-frustum-ebene-schneidung-in-Lua/ Do you have any questions related to the math or the implementation? Do not shy away from asking! I want to provide you with as much insight as I can.1 point
-
Hi, I was testing fetchRemote function and decide to create script that's gonna load map from cloud / URL. I added some settings soo you can create the whole system out of this few lines of code. Also this resource is gonna need access to 'fetchRemote' function, simply add it in ACL and you can use it. There are 2 maps added so you can test it out. local customMapsRawData = { ["Trash on Grove Street"] = { ["active"] = true, -- is map enabled or not ["link"] = "http://www.gubi.studio/tut/mta/trash-on-grove-street.txt", -- link to text file which contain whole data of your .map file ["visibleTo"] = getRootElement(), -- element which should see the map, can be player/getRootElement() ["annoucment"] = true, -- if set to true will annouce on chat that map has been loaded }, ["Shop on Grove Street"] = { ["active"] = false, ["link"] = "http://www.gubi.studio/tut/mta/shop-on-grove-street.txt", ["visibleTo"] = getRootElement(), ["annoucment"] = false, } } local function createMapFromRawData(data, error, mapName, annoucment, visibleTo) if error == 0 then loadMapData(xmlLoadString(data), visibleTo) outputDebugString("Map "..mapName.." has been loaded!") if annoucment == true then outputChatBox("Map "..mapName.." has been loaded!", root, 0,255,0) end else outputDebugString("Map "..mapName.." failed while loading! Check if link is valid!", 3) end end local function loadCustomMaps() if not hasObjectPermissionTo(getThisResource(), "fetchRemote", true) then outputDebugString("This resource needs access to \"fetchRemote\" in ACL!", 1) return end for mapName, mapData in pairs(customMapsRawData) do if mapData["active"] == true then fetchRemote(mapData["link"], createMapFromRawData, "", false, mapName, mapData["annoucment"], mapData["visibleTo"]) end end end addEventHandler("onResourceStart", getResourceRootElement(getThisResource()), loadCustomMaps)1 point


